Dec 22, 2008
Operations Configuration

Dec 18, 2008
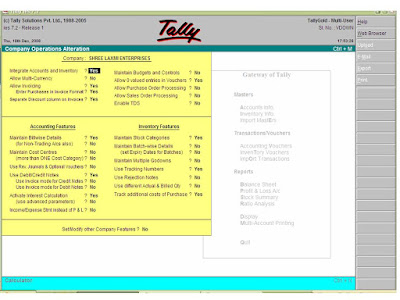
Activate Company Features [F11]

Unlike Configuration [F12], Company Features is specific to the current company only. Therefore, each company may have different features active. For example, a company in your group may need multi-currency whereas another company may not. Configuration options, on the other hand, affect all companies maintained in the same DATA directory and setting configuration for one company will affect other companies in that data directory.
Please note that certain features like multi-currency and multi-locations, once set to Yes, cannot be modified if the feature has been used. However, other features like Cost Centres and Bill-wise details can be modified even if they are used. If you reset the option after having used the feature in transactions, it is advisable to rewrite the company by using [CTRL+[ALT]+[R].
The two features - Cost centres and Bill-wise details- must be activated here for them to be available for ledger accounts. Each ledger account can then individually be set for the feature as required. For example, the options will become available for both 'A & Co' (a Debtor A/c) and 'Rent' (an Indirect Expenses A/c). You would want Bill-wise details but not Cost Centres for A & Co and vice-versa for Rent. Further details on these features are mentioned under Ledger.
Company Information Menu
The Company Information menu comprises of:
Select Company
To Select or load a company
Shut Company
To Shut a company
Create Company
To Create a company
Alter
To Alter a company
Change TallyVault
To secure the data by providing a TallyVault password.
Backup
To take a backup of the company data
Restore
To restore a data backup
Gateway of Tally of an "Accounts-with-Inventory" Company

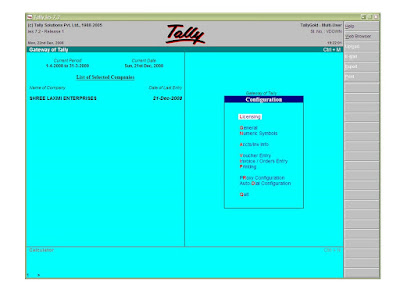
The Gateway of Tally screen is separated into four sections, – Title Area, Main Area (Ctrl + M), Calculator Area (Ctrl + N)and the Button Bar.
Main Area
The left-hand side of the Main Area gives information of
Current Period – this is the currently loaded or selected company's accounting period.
Current Date – this is the date of the last Voucher Entry of the selected company (this is NOT the calendar date).
List of Selected Companies – This displays the name of the loaded or selected company.
Masters – for creation of Accounting Masters and Inventory Masters and Importing Master information.
Transactions / Vouchers - for creation of Accounting Vouchers and Inventory Vouchers and Importing transaction information.
Reports – for viewing and printing financial and inventory reports using the information given in Masters and Transactions.
Button Bar
The Button Bar area on this screen, displays the following buttons (keys):
Help (Alt + H) – to access Tally's online context-sensitive help
F1: Select Cmp – to select a company
F1: Shut Cmp – to shut or close the company
F2: Period – to change the period
F3: Cmp Info – to access the Company Information Menu
F11: Features – to access the Company features for a company
F12:Configure – to access the configuration settings to manage the information put into Tally.
Note: You cannot load more than one company at one time. The loaded or selected company will be shut first and then the other company is loaded.
Important:
1. Use the buttons on the right-hand side of the screen to Explore the Potential of Tally.
2. Press [Enter] wherever the cursor is placed to know the Depth of Tally!
Gateway of Tally of an "Accounts Only" Company
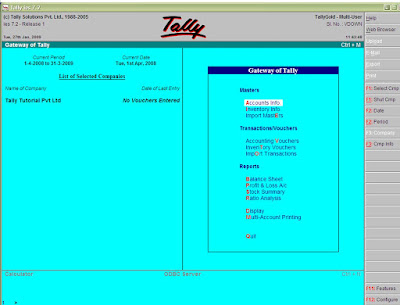
The Gateway of Tally screen is separated into four sections, – Title Area, Main Area (Ctrl + M), Calculator Area (Ctrl + N) and the Button Bar.
Main Area
The left-hand side of the Main Area gives information of
Current Period – this is the currently loaded or selected company's accounting period.
Current Date – this is the date of the last Voucher Entry of the selected company (this is NOT the calendar date).
List of Selected Companies – This displays the name of the loaded or selected company.
Masters – for creation of Accounting Masters and Importing Master information
Transactions / Vouchers - for creation of Accounting Vouchers and Importing transaction information
Reports – for viewing and printing financial reports using the information given in Masters and Transactions.
Button Bar
The Button Bar area on this screen, displays the following buttons (keys):
Help (Alt + H) – to access Tally's online context-sensitive help
F1: Select Cmp – to select a company
F1: Shut Cmp – to shut or close the company
F2: Period – to change the period
F3: Cmp Info – to access the Company Information Menu
F11: Features – to access the Company features for a company
F12:Configure – to access the configuration settings to manage the information put into Tally.
Note: You cannot load more than one company at one time. The loaded or selected company will be shut first and then the other company is loaded.
Company Information

The Gateway of Tally screen is separated into four sections, – Title Area, Main Area (Ctrl + M), Calculator Area (Ctrl + N) and the Button Bar.
The screen elements of the Gateway of Tally screen is explained below:
Top Area
Top Area contains Version number, Release details (every time a new release of Tally is made, it is identified with a different release name like Release 3.14) and Current Date (the date configured in the computer). The name of the day, date, month and year is displayed in DD, MM, YYYY format on the left-hand side.
Tally logo is displayed at the centre of the Top Area.
The Product type (Tally Gold, Tally Silver, Tally Bronze or Educational) and Tally Serial Number appears on the upper-right corner. The software serial number is usually a unique number (taken directly from the TallyLock connected to the USB / Parallel port of the system). System time (the time configured in the computer) appears on the upper-right corner in Hour: Seconds: Minutes (HH/MM/SS) format.
Minimize Button
The Minimize button performs the standard Windows Operating Systems function (Windows 95 onwards), allowing you to minimize Tally and work on other applications. To restore Tally, click on the Tally icon on the taskbar.
Main Area (Gateway of Tally)
Main Area is separated into two areas:
Left-hand side area
Right-hand side area
The left-hand side area in Main Area provides information of Current Period, Current Date and List of Selected Companies (Name of the company and the date of last entry details).
The right-hand side area in the Main Area screen displays the Company Information menu (to select your instructions to Tally) > Select a Company, Create a Company, Backup a Company or Restore a Company.
Hot Keys
Hot keys are the text that are capitalized and are red in colour on all the menu screens. Typing any of the Hot Keys in the Company Info Screen will either take you to that particular screen or it may display the sub - menu’s within that Option.
Calculator Area
Press [Ctrl + N] to activate the calculator functionality. Calculator Area is used for calculator functions. Any type of Independent calculation can be done using calculator to get quick answers.
Button Bar
The buttons are designed to make the work easier and faster. These buttons vary from one screen to another based on the screen functionality. The buttons appear on the right hand side of the Tally screen. Only buttons relevant to the current screen will be active and the inactive buttons are greyed. These buttons are enabled with the short cut keys (like F1, F2 and so on). You can either click on these buttons or you can press the shortcut keys to access.)
On this screen, Tally displays the following buttons (keys):
Help (Alt + H) – to access Tally's online context-sensitive help (This feature is not available for Tally on RHEL)
Web Browser (Alt + W) – to access the Web Browser directly from Tally!
F1: Select Cmp – to access data from other data directories either on the local system or through the network.
F12: Configure – to access the configuration settings to manage the information put into Tally. Here, access the General Configuration to set country specific defaults. Use it before creating a company.
Note:
* Use the buttons on the right-hand side of the screen to explore the Potential of Tally.
* Press [Enter] wherever the cursor is placed in Gateway of Tally Menu’s and sub menu’s to know the Depth of Tally.
Buttons with a character or function key underlined means you have to press underlined character or the function key along with SHIFT key.
Buttons with a character or function key double underlined means you have to press character or the function key along with CTRL key.
F1: Press the shortcut function key to select a company
F1: Press SHIFT+F1 to shut a company
F8: Press CTRL+F8 to select the Credit Note voucher
Ctrl+M: Press Ctrl + M to access the Gateway of Tally.
Ctrl+N: Press Ctrl + N to access the Calculator/ODBC Server frame
Additional Information
The Tally Clock
While Tally processes data, you will see a clock on the screen indicating that you should wait until it disappears before performing the next action.
Dec 16, 2008
What is the process for converting data from Tally 7.2 to Tally 9 (Data Migration / Data Conversion)?
• Install Tally 9
• Now run 'TallyMigrateData' utility from Start > Programs > Tally 9 > TallymigrateData
[Note: You can also run the migration utility by double clicking tally72migrate.exe file located in the folder where Tally 9 is installed]
• The utility will launch Tally Data Migration Tool and Tally 9
• Select 'Migrate Data' in the Migration Company screen
• Specify the directory where Tally 5.4 data is located in the 'Directory' field (Say, 'C:\Tally54\data')
• Select the company from the List of Companies
• Data Migration utility loads the data of selected company and asks for confirmation
• Select 'Yes' and start the migration of selected company
• The status of is shown in the Migration Messages Pane
• When the migration is complete, it displays an information pop-up, "Migration Completed, Check Statistics (press any key)"
• On pressing any key 'Congratulation' message appears confirming the completion of the migration of the data
[Note: If any error occurs during migration, it gets logged into a file 'migration.err', which is automatically generated and made available in the folder where Tally 9 is installed]
• The migrated company is by default saved in the Tally 5.4 data folder. The migrated data is prefixed with a '0' and appears as a 5 digit number. For example, if the company folder number, before migration was '0099', after migration it would be '00099'.
• Now your migrated data is ready for use in Tally 9
What is the procedure to install Tally 9?
Method 1:
• Click install.exe from the CD
Method 2:
• Click START from Windows
• Select RUN
• TYPE
• Press ENTER key
Follow the instructions on your screen to install Tally.
• The Tally Setup Wizard is displayed.
• Click Next to continue
• The Installation wizard displays the License Agreement. Read the license agreement before you proceed. Click I Agree to continue. Click I Decline to stop setup or click Back to go to the previous screen.
• In the Installation screen, you may accept the suggested directories. Else click Change Application Directory or Change data Directory or Change Configuration Directory or Change Language Directory to change the respective directory paths. Use Tab or the mouse to change the path in any of the directories.
Application Directory The Tally program files reside in this directory.
Data Directory
The Tally data resides in Data directory. The default directory where data is stored is C:\Tally\Data. To change click on Change Data Directory button and enter the new directory.
When Tally is installed in a directory with an earlier version, it detects and retains the data configuration path of the previous installation.
Configuration Directory
Tally configuration files reside in this directory. Specify the path of the directory where configuration files should be saved. It is usually the same path as that of the Application directory.
Language Directory
Tally Language files (.dct) reside in this directory.
Specify the path of the directory where the Language files will be maintained. It is usually the same path as that of the Application Directory.
Note: If you are a Multi-License User, select the Run Tally License Server at Windows Startup check box.
During installation, you are prompted to specify the path and the OS files to install the Indic languages.
• Click Install Operating System Language Support to enable Language Support.
• Select your Country name in Country Selection.
• 7. Select the Initial Startup Language from the list. When you start Tally for the first time, Tally will appear in the language selected as the Initial Startup Language (screen).
• Once you select the Initial Startup Language, Click Install to proceed with the installation.
• The installation progress status is displayed as shown below.
• Insert Windows CD to install language or Browse for the i386 folder in your system.
Note: You will be prompted to install the i386 language support folder only if it is not available in your system
• Click Finish to complete Setup.
After completing installation, you can click Tally icon on the desktop to start working on Tally.
Dec 15, 2008
Our Mission
Objective of getting Accounting Education
Information technology and accounting
Information technology today is a critical success factor for designing accounting packages. The importance of information technology as an agent of accounting packages design has resulted from its effect on matrix of the organizational changes. The matrix includes business processes, organizational structure, organizational role and technology. These elements are often interrelated so that appropriate functioning of one element depends greatly on that of other elements.
Information technology has revised the reporting system. A new accounting, reporting and communication model has been established due to information technology. Dramatic transformations happened in the pattern of information quality such as timeliness, flexibility, versatility and adaptability. Information technology is a critical factor for achieving quality dimensions of accounting information.
Information technology has revised the reporting requirements of the accounting reporting system. A significant change has been in the nature, scope and presentation of the accounting reporting model .Also, information technology has elaborated the dimensions of accounting reporting model.
Information technology revolutionized the accounting knowledge and developed new accounting concepts and techniques to manage the accounting processes. A new type of accounting education integrating technology, connectivity and creativity contents into the accounting curriculum to provide the accountant with the required knowledge to seek and use information in a collaborative and creative way has evolved.
Information technology has positively impacted the pattern of the accounting processing system, e.g. , flexibility , smoothening , and functioning have been achieved due to information technology .
Information technology has brought positive changes in the style, scope and level of accounting control.
Smoothening, functioning, automation, processing control and flexibility of accounting process as design parameters for the accounting processing system had strong and medium correlation with information technology.
Information technology has substantially changed the nature of the financial accounting knowledge.
The accountant’s community is in a severe need to change the behavioral considerations, which affect acceptability of information technology such as feelings and attitudes toward a new processing technology. Adopting more positive and confident view in this regard is still needed.
Information technology has mode possible the concept of high quality accounting processing system whether by reducing processing errors or by improving timing and availability of accounting information.
The development of various accounting packages has been affected by using information technology through reducing the number of accountants and raising their technical and skill qualifications.
Accountant of Accountants
God is only one accountant in whole world who is accountant of accountants . So do not cheat any other person by your good accounting skills . It may be that your fraud can not get my Chartered accountant or auditor but when you go in the court of God , you can conceal his fraud . Because God is seeing everything . Every second he is recording or mistake and our fraud in his accounts .
It is true that his recording period is longer than any business financial year but when God tells your all cheating in your accounts , it is sure , you will feel wonder but you never save from his result and punishment .
So honest in your field of accounting .
God gives you an priceless skill in accounting so please use it for developing your nation , for developing your people .
Moreover , I want to tell you that just capturing some money by cheating in accounting is not the real aim .
You are accountant , Identify your self , you are the one person in whole organisation in which whole organisation's fund supply and demand on your true accounting reports . Why are you cheating in the accounting reports .
Try to leave your all demerits and weakness and bad habits and bad thinking before adopting this noble profession


