Jan 31, 2009

How to send an Email from tally

The E-mail is the most widely used facility on the Internet. It saves time and cost of postage. Use the email feature in Tally.
• E-mail any Tally report or document like invoices or purchase orders
• Post reminder letters and statement of accounts
The following example illustrates the use of this feature in Tally
E-mail a Invoice
To send a Invoice to a customer by email:
1. Gateway of Tally > Display > Accounts Books> Sales Register >
2. Select the required Invoice from the sales Vouchers
3. Click on Email from the button bar or press Alt+M
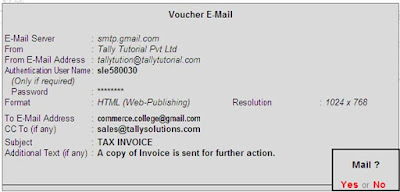
1. The fields on the Mailing Invoice form are automatically completed if you have given the required information during creation of the master records. Select No or press Backspace to change/modify the entries. Select Yes to accept.
2. The E-mail Server field is highlighted next. This is a mandatory field. The first time you use this feature in Tally, enter the name of your SMTP server, example: mail.btinternet.com. Subsequently, Tally will automatically display the SMTP server name. Refer to your Internet Service Provider (ISP) or network administrator for further queries.
3. The From field displays the name of your company entered in the Company Creation screen and stored in the Company Information Master records. You can also modify the default information. Press Enter.
4. The From E-mail Address field displays the e-mail address entered in the Company Information Master data. Enter your email address, if you have not done so while creating a company, or if you want to change the id.
• Enter the user name and password in Authentication User Name (Only if required) and Password field respectively if the mail server requires authentication.
• In the Format field a pop-up screen lists the three formats in which you can generate your email:
o ASCII (Comma delimited)
o HTML (web-publishing)
o XML (data interchange)
Select the type that suits your recipient.
1. To E-mail Address field is a mandatory field.

It displays the recipient’s email address as entered in the Mailing and Related details during ledger creation. Enter the address if you have not done so while creating the ledger or if you want to modify the information.
1. Type the email address of another recipient to whom you want to send a carbon copy of the email in the CC (if any) field.

1. The Subject field is filled by default and displays the subject of your mail. You can change it to a subject of your choice.
• Any text you enter in the Additional Text field precedes the report in the recipient’s mail program. You can use this field to type a message to the recipient.
• Additional Options provided in the form are:
o Include Post-Dated Transactions?- Set this option to Yes to include post-dated transactions.

Note: Additional Options may vary depending upon the type of report you want to email.
1. Print Preview: Use the Print Preview screen to view the document before emailing. This shows how the document appears in the recipient’s email


Jan 29, 2009

Sales Item Invoice


Invoicing is generally used for sale of stock where the details of the items sold are listed. Selecting the Item Invoice allows you to select the stock items to be invoiced. This format is more commonly used by trading and manufacturing organisations.

On the Sales invoice screen - click on the button (Item Invoice) on the right-hand side of the screen and the Sales Item Invoice appears as:


Tally's Item Invoice mode - displays the list of stock items, which can be invoiced as required.

The Item Invoice button toggles with Account Invoice.

Procedure

  1. Enter the date of sale
  2. Enter the ref; if any other wise skip it
  3. Select party account name from pop up window. If it new one then create the party there it self by pressing ALT+C.
  4. Select the type of sale. Like sales @ 4%, sales @ 12.5% etc.
  5. Select the vat tax class, Like 4%, 12.5% etc.
  6. Select the item to be sold from pop up window. ( list of items).If it new one then create the item there it self by pressing ALT+C. .
  7. Enter the quantity to be sold.
  8. Enter the rate of item in your currency.
  9. More items are there, then repeat the procedure from 6 to 8.
  10. After items are over then enter.]
  11. Select the corresponding tax ledger from pop up window.If it new one then create the ne tax class there it self by pressing ALT+C. .
  12. Enter the any packing & forwarding charges or freight charges if any.
  13. Enter addition or subtraction amount for rounding of total value.
  14. Enter the narration / Remarks if any.
  15. Press enter to accept the details.
your sales voucher is saved.
if you you can take print out of that.

Sales Entry (F8)

When a sales transaction takes place, a document, detailing the transaction (item name, tax, etc) has to be given to the buyer (debtor) as proof of purchase by him. This document is called "Invoice" or "Bill" or "Cash Memo". The practice of issuing an Invoice, which is in vogue, is available in Tally.

Gateway of Tally > Accounting Vouchers > selecting F8, Tally displays the Sales Invoice screen. The Invoice mode is default. To enter details of sale transactions – use Tally's Sales entry (F8 – in Accounting Vouchers).

Sales entries can be made in the Voucher as well as Invoice Formats.

Invoicing or sales invoicing is not very different from sales voucher entry. The advantage of using the invoice format for sales invoice entry is that, automatic calculations of taxes and duties (ledger accounts classified under the group 'Duties & Taxes') is possible.

The default Sales Invoice screen appears as:


Tally prompts for the Sales Ledger to be allocated to - at the beginning of the entry. There after, any number of stock items or account ledgers can be selected one after another – enabling faster data entry. This is possible as the option Use Common Ledger A/c for Item Allocation in F12: Configure on the invoice entry screen is set to YES (by default)

There are two types of Invoices, namely,

Item Invoice > you can select ITEMS for invoicing

Account Invoice > you can select LEDGERS for invoicing

Contra Entry (F4)

Gateway of Tally > Accounting Vouchers > selecting F4: Contra > displays the Contra voucher entry screen. As per accounting rules, Contra Entry is a transaction indicating transfer of funds from:

  1. Cash account to Bank account

  2. Bank account to Cash account

  3. Bank account to Bank account

Contra Entry screen appears in the Single Entry Mode by default. You are prompted to choose the account, which will receive the amount (the debit ledger).

For example, you wish to transfer of funds from Cash Account into Bank Account – you will debit the Bank Account and credit the Cash Account > the entry appears as:


The ledger selected in "Account" (Axis bank ltd) is the destination ledger – debited.

Advantages of Single Entry Mode:

  1. Faster data entry!

  2. Selection of Multiple Ledgers to be credited with a Single Ledger to be Debited OR Multiple Ledgers to be debited with a Single Ledger to be Credited -> depending on the nature of transaction.